Many resin products used in our daily lives, such as smartphones and car bumpers, require durability against impact. Some of the simplest methods used to determine the impact resistance and toughness of resin are Charpy and Izod impact tests. They are pendulum impact tests that apply high-speed impact to a test sample.
What Is a Pendulum Impact Test?
Table of Contents
A pendulum impact test uses the principle of a pendulum: a pendulum hammer swings down from a specific height and strikes a V-notched sample. The impact energy (the energy necessary to break, deform, or push away the sample) is measured to determine the sample’s impact strength, which is the impact energy absorbed in breaking the sample. The greater the impact strength, the greater the energy absorption upon impact. Therefore, materials that can absorb more energy are more tough and can withstand greater impact.

Angle of Hammer Rise and Impact Energy
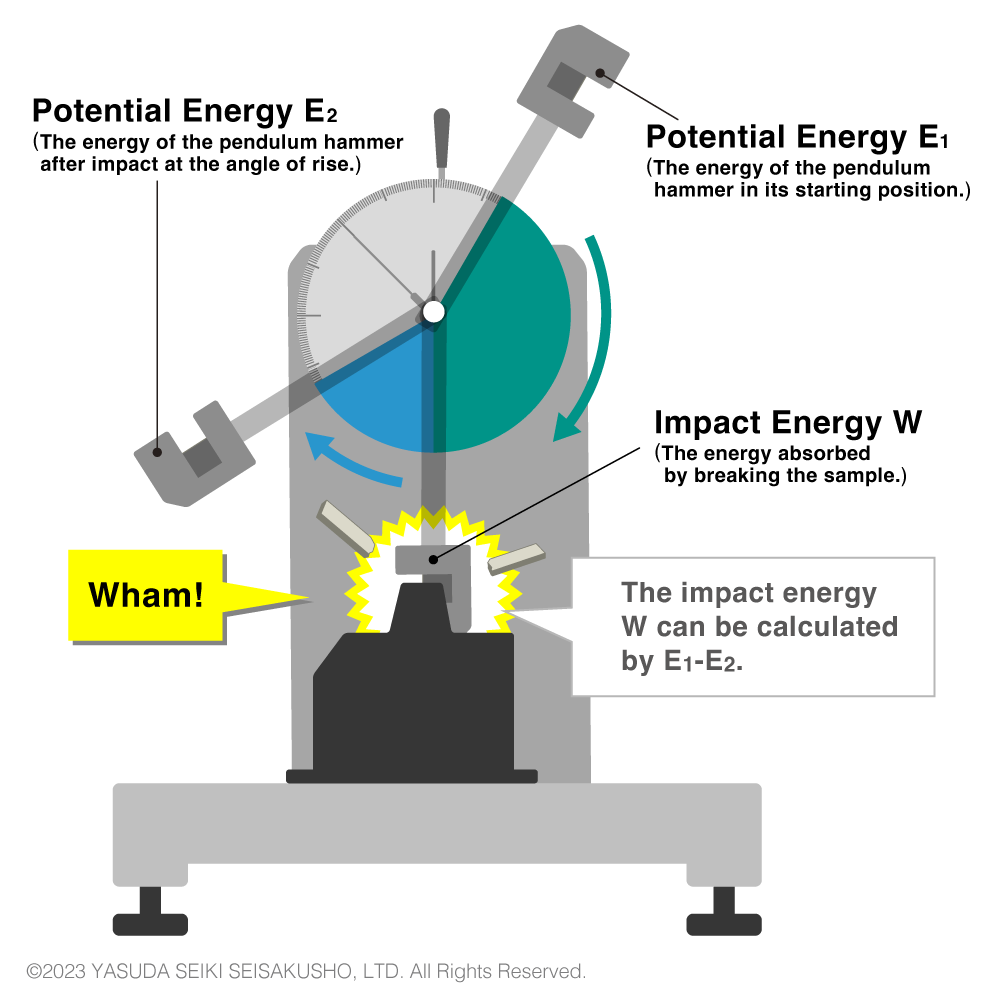
The impact energy is the difference between the hammer’s potential energy before and after the sample breakage.

W = energy absorbed by breaking the sample
E1 = potential energy of the hammer at its starting position
E2 = potential energy of the hammer after impact at the angle of rise
To calculate the impact energy, we must find the difference between two angles: 1) the angle of hammer rise after impact, and 2) the angle of hammer rise when there is no test sample. In addition, we must also consider the energy loss that occurs due to the air resistance and friction in the pendulum bearing. Therefore, the measured energy is corrected for accurate results. At Yasuda Seiki, we use the Simplified Correction Method.
【Simplified Correction Method】

Wc = the absorbed energy after correction (J)
WR = moment around the axis of rotation of the hammer (N・m)
α = hammer release angle (°)
α’ = angle of rise without a test sample when the hammer is released from angle α(°)
β = angle of rise after impact (°)
【Calculating the Impact Strength (kJ/㎡)】
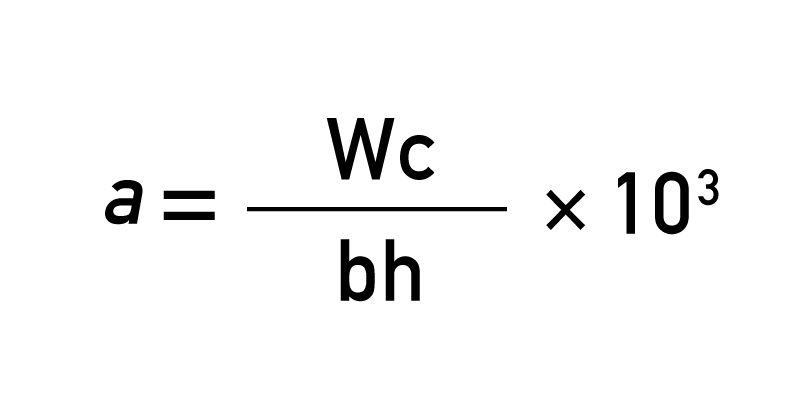
a = impact strength (kJ/㎡)
Wc = the absorbed energy after correction (J)
b = sample width (mm)
h = sample thickness (mm)
Test Methods
There are mainly three types of pendulum impact tests: Charpy, Izod, and tensile impact tests. The former two methods are the most common, and will be discussed in this article.
Charpy Impact Test
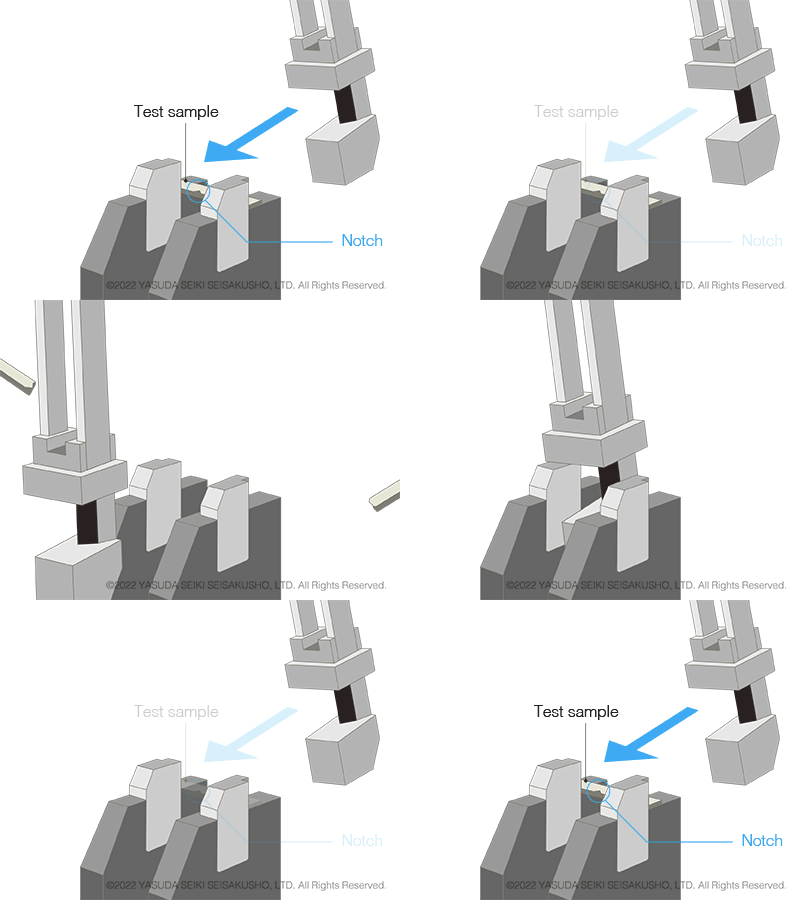
Test Standards of Charpy Impact Tests: JIS K 7111-1, ISO 179-1, ASTM D 6110
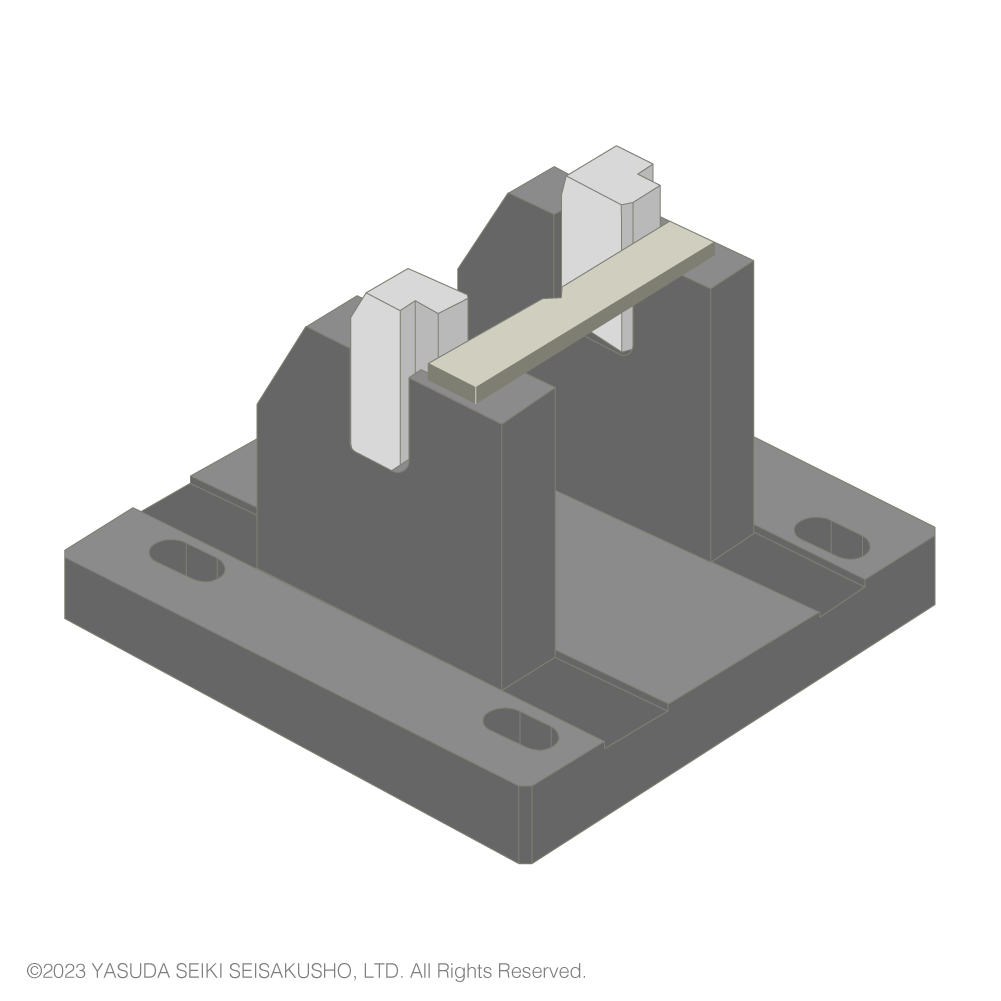
In a Charpy impact test, the test sample is supported at both ends. The hammer strikes the center of the sample on the side opposite of the notch. The sample is set simply by placing it on the anvil (test station) and therefore tests can be performed easily and efficiently.
The Charpy impact test is the mainstream test method of pendulum impact tests and is more commonly used compared to the Izod impact test.
Izod Impact Test
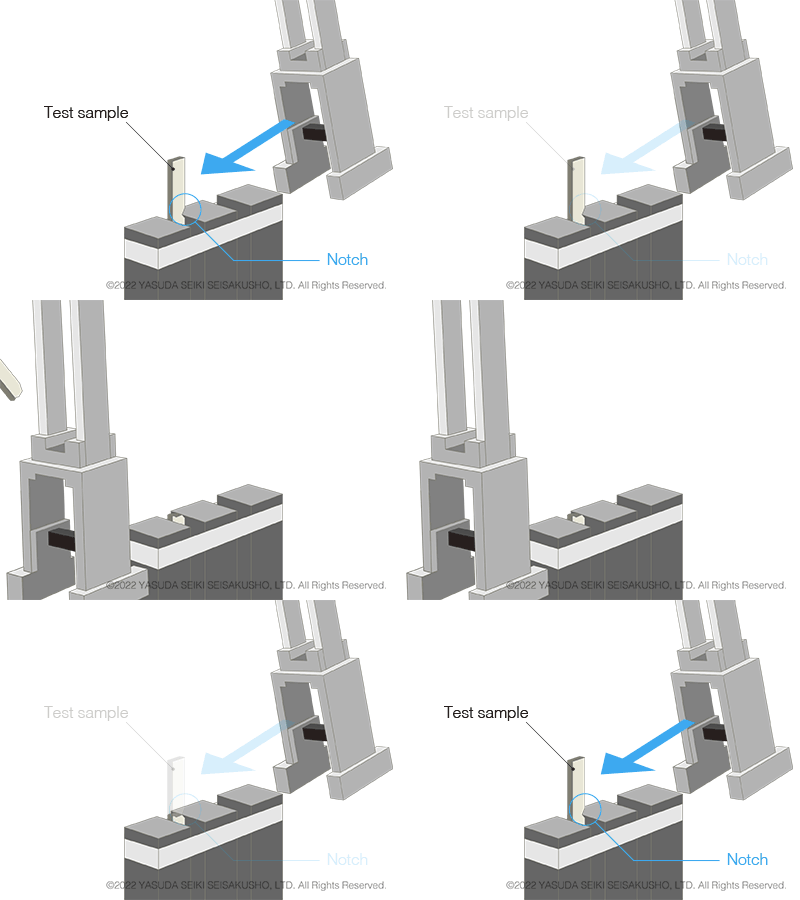
Test Standards of Izod Impact Tests: JIS K 7110, ISO180, ASTM D256
In an Izod impact test, the test sample is fixed at one end. The hammer strikes the other end on the side with the notch. Compared to Charpy impact tests, this test method includes more steps in the procedure and therefore requires more work. However, it is still used today by several automobile manufacturers. The suppliers of parts and materials for such automobile brands also conduct Izod impact tests.
Test Standards
The test methods and testing machines used in Charpy and Izod impact tests are standardized by the International Organization for Standardization (ISO), Japanese Industrial Standards Committee (JISC), and American Society for Testing Materials (ASTM).
| Standard | Topic | Title | |
|---|---|---|---|
| JIS※1 | K 7111-1 | Charpy | Plastics—Determination of Charpy impact properties—Part 1: Non-instrumented impact test |
| K 7110 | Izod | Plastics—Determination of Izod impact strength | |
| B 7739 | Impact testing machines | Pendulum-type impact-testing machines for non-metallic materials—Verification of testing machines | |
| ISO | 179-1 | Charpy | Plastics—Determination of Charpy impact properties—Part 1: Non-instrumented impact test |
| 180 | Izod | Plastics—Determination of Izod impact strength | |
| 13802 | Impact testing machines | Plastics—Verification of pendulum impact-testing machines—Charpy, Izod and tensile impact-testing | |
| ASTM | D6110 | Charpy | Standard Test Method for Determining the Charpy Impact Resistance of Notched Specimens of Plastics |
| D256 | Izod | Standard Test Method for Determining the Izod Pendulum Impact Resistance of Plastics | |
※1Japan Industrial Standards
【Related Standards】
| Standard | Title | |
|---|---|---|
| JIS | K 7062 | Testing method for Izod impact strength of glass fiber reinforced plastics |
| K 7077 | Testing method for Charpy impact strength of carbon fiber reinforced plastics | |
Hammer, Anvil, and Test Samples
Along with the test procedure, the details of the pendulum hammers, anvils, and test samples are specified in ISO, JIS, and ASTM standards for both Charpy and Izod impacts tests. Therefore, it is essential to understand the basics of the standardized test methods.
Charpy Impact Tests
Charpy Hammers
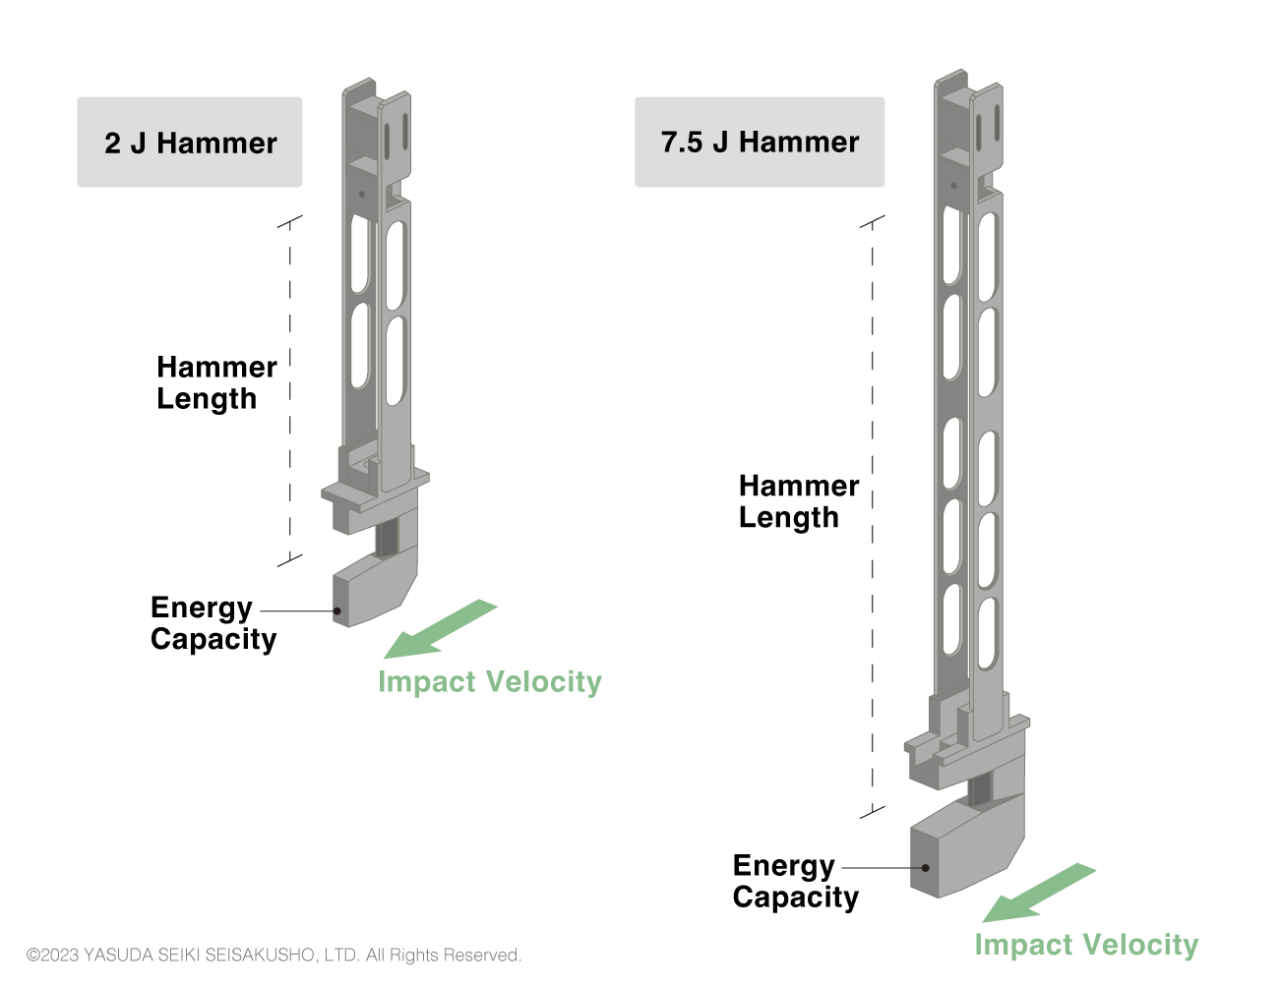
| Standard | Potential Energy (J) |
Max. Permissible Friction Loss Without Sample (% of Energy Capacity) |
Impact Velocity (m/s) |
Angle of Striking Edge (°) |
Radius of Striking Edge (mm) |
|---|---|---|---|---|---|
| ISO/JIS | 0.5 | 4 | 2.9 (±10%) | 30±1 | 2.0±0.5 |
| 1 | 2 | ||||
| 2 | 1 | ||||
| 4 | 0.5 | ||||
| 5 | 0.5 | ||||
| 7.5 | 0.5 | 3.8 (±10%) | |||
| 15 | 0.5 | ||||
| 25 | 0.5 | ||||
| ASTM | 2.7–21.7 | N/A | 3.46 | 45±2 | 3.17±0.12 |
The characteristics of the Charpy hammers differ between the test standards as shown in the table above. In ISO and JIS standards, the hammer length changes according to the impact velocity. Therefore, the same hammer cannot be used to create, for example, a 4 J impact and 7.5 J impact. Two different hammers must be prepared.
Charpy Anvil
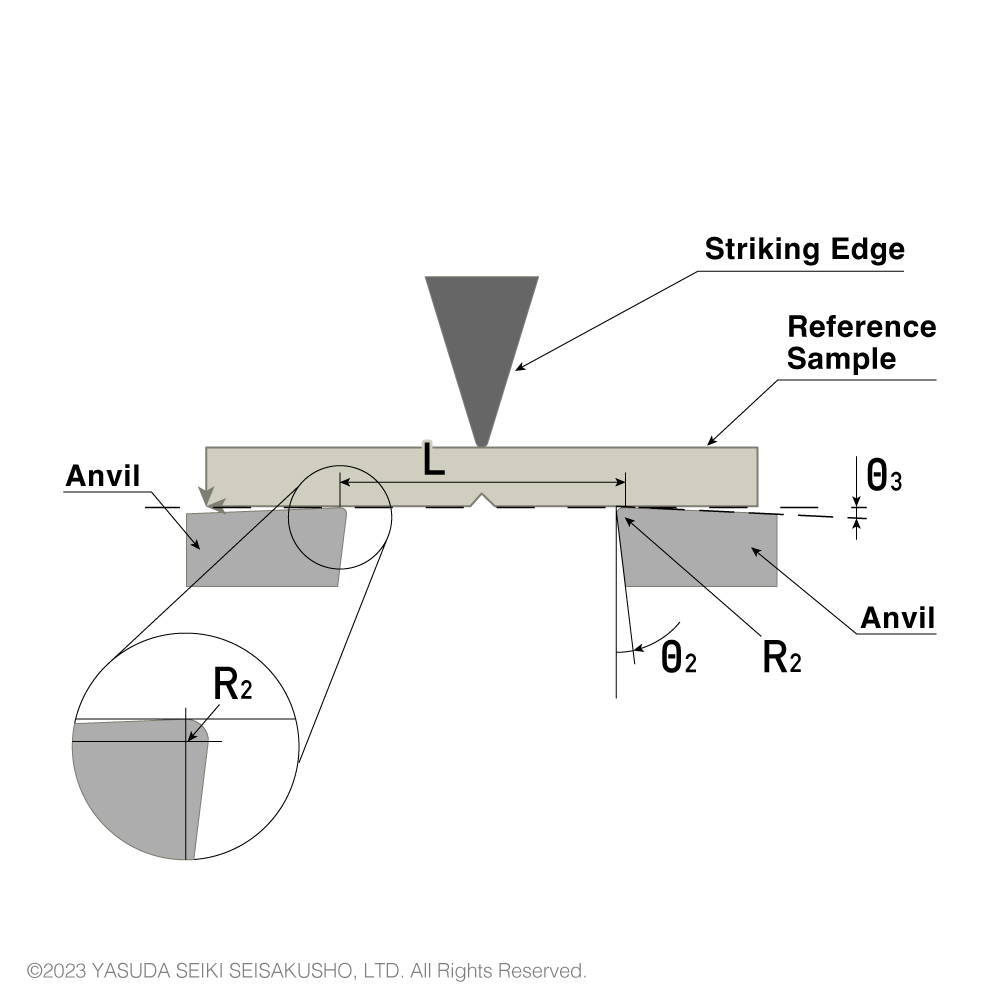
| Symbol | Parameter | ISO/JIS | ASTM |
|---|---|---|---|
| ― | Parallelism between long axis of test sample and reference plane | ±4/1000 | N/A |
| R2 | Radius of curvature of anvils (mm) | 1±0.1 | 3.17±0.12 |
| θ2 | Angle of taper of anvils (°) | 10±1 | 0 |
| θ3 | Angle of slope of anvils (°) | 5±1 | 0 |
| ― | Angle of supports and anvils (°) | 90±0.1 | 90 |
| L | Span between sample supports (mm) | 62±(0.5/0) | 101.6±0.5 |
The shape of the anvil differs between ISO (or JIS) and ASTM standards. Therefore, to perform both ISO and ASTM standardized tests, two different anvils shall be prepared.
Dimensions of the Charpy Test Sample
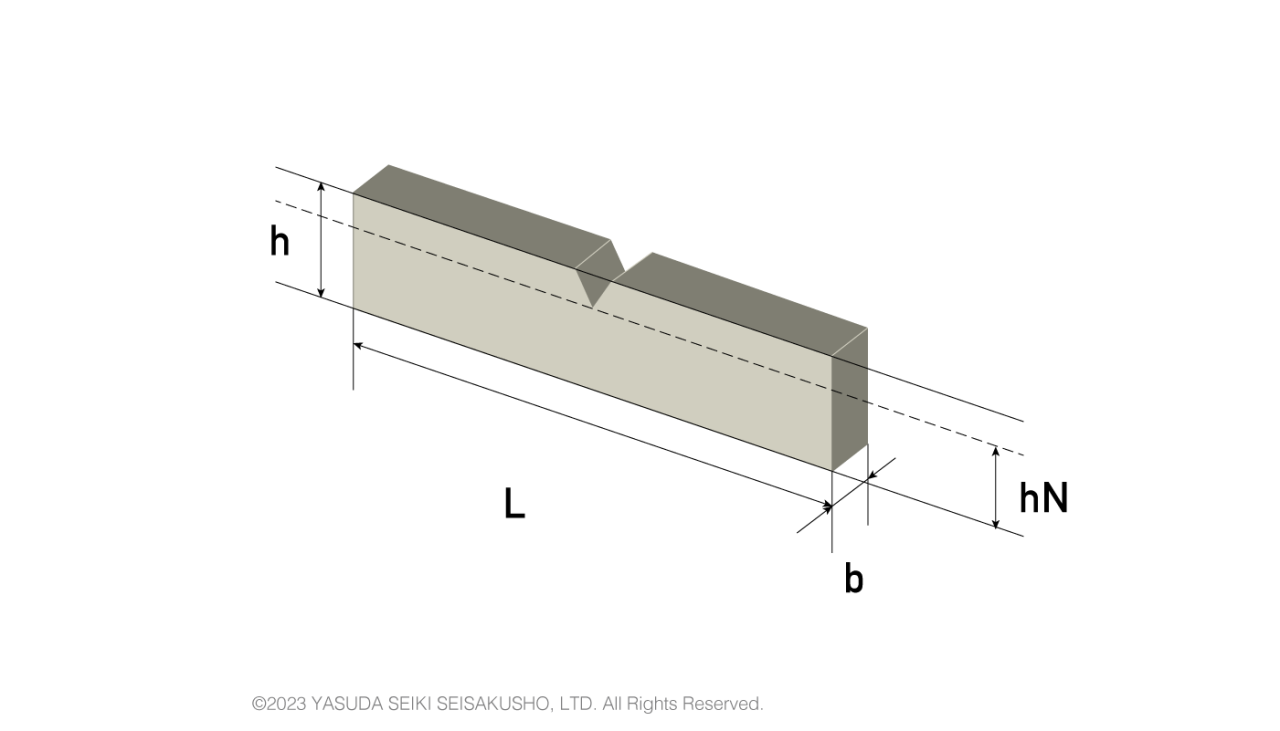
| Standard | Length L (mm) |
Width b (mm) |
Thickness h (mm) |
Remaining width at notch tip hN (mm) |
|---|---|---|---|---|
| ISO/JIS | 80±2 | 4.0±0.2 | 10.0±0.2 | 8.0±0.2 |
| ASTM | 124.5–127 | 3.0–12.7 | 12.70±0.15 | 10.16±0.05 |
The ISO and JIS standard of the notch depth is 2 mm, whereas the ASTM standard is 2.54 mm. ASTM also does not specify the exact length and width of the test sample, but instead indicates a specific range.


